Tuesday, March 15, 2011

Tuesday Already!

     Whew!  Where did the weekend go?  Oh well, it was crazy-busy-fun while it lasted.  I hope yours was great too!  I had a fabulous time at the crop I attended on Saturday, and they raised some money for a good cause.  Now I'm trying to catch up with real weekday life again.  But I can't complain too much - spring has sprung in my gardens, and new life is poking up through the soil.  I'm sooo ready for spring!

     For today, the rainy weather makes a perfect day for crafting (and cleaning, but that's no fun to talk about).  I have a stamped card to share with you.  I used a stamp from a set that my husband Mick and our grandson Dalton picked up for me at an auction.  Wasn't that sweet!
     Sorry the color doesn't show too well in the picture.  You can see that this paper is very sparkly, and the entire card is done in shades of brown and green.  These stamps are very detailed, and have very fine lines so the image ends up looking quite delicate.  What do you think?

     Well, my clean laundry is waiting for me, so I'd better get busy folding.  If I hurry, I might sneak in some craft time later!

Bye for now,
Anne
  

Thursday, March 10, 2011

Funky Chicken Thursday!

     Well, the weekend is getting closer.  It should be easy sailing from here to the weekend, so relax and start the fun now!  I have another cute chicken card to share with you, and hopefully it brings a smile to your face.
     This chicken image and the phrase, like yesterday's, are from the Country Life Cricut Cartridge.  I used the same papers for both cards, but this one I added a bit of ribbon.  Again, I cut the brown shadow twice so that I could put one shadow flat on the card and raise the other one on sticky foam.  I just love all the great images on this cartridge!

     That's all for today.  I have a full schedule today, so I have to run.  You have a fabulous day today! 
Bye for now,
Anne

Wednesday, March 9, 2011

Well, we've made it to Wednesday again!

      We've reached the middle of the week again.  It should get easier from here, so relax and enjoy!  In the meantime, check out this card that I made with the Country Life Cricut Cartridge.
     This is one of the cartridges that I don't have yet, but a friend of mine very sweetly let me borrow it.  I have been wanting this cartridge for a while, but after I saw all the cute images and phrases on it, now I know that I have to have it!  This card is one of a set of two chicken cards.  Isn't it cute?  So easy to put together!  I did add a little ink on the edges (of course), and some faux stitching in a couple of spots.  I also cut two of the brown chicken shadows so that I could place one flat on the card, and raise the other one on sticky foam for a little dimension.

     Well, that's all for today.  Don't forget to leave me a comment, and stop by again tomorrow.  

Bye for now,
Anne

Tuesday, March 8, 2011

A Birthday Card for Tuesday

     Hello again!  I hope you're having a great day.  I have another card to share with you.  Sometimes it can be hard to come up with a masculine birthday card, but this one would be perfect for a guy. 
     The tan mat was cut with a Nestabilities die in my Cuttlebug.  All the papers are from the same collection from S.E.I.  I added a little ink, some hemp, and a few buttons and the card was finished.  The end result is a beautiful card for a man or a woman.  Super easy!  I hope you like it.

Bye for now,
Anne

Monday, March 7, 2011

Monday Mini-Album!

     Happy Monday!  I hope you had a wonderful weekend.  Did you get some crafting in?  I had a great time Saturday at the scrapbook Crop that I attended.  Now I can't wait for the next one.  Good thing it's next Saturday!  Usually I don't get to go to crops so close together, but it just worked out this time.  Yipp-ee! 

     Back to the business at hand.  You didn't stop by to read my ramblings, you want to see a project, right?  Don't worry, I have one to show you.  I haven't shared a mini-album with you in a while, and I thought that might be a good way to start the week.
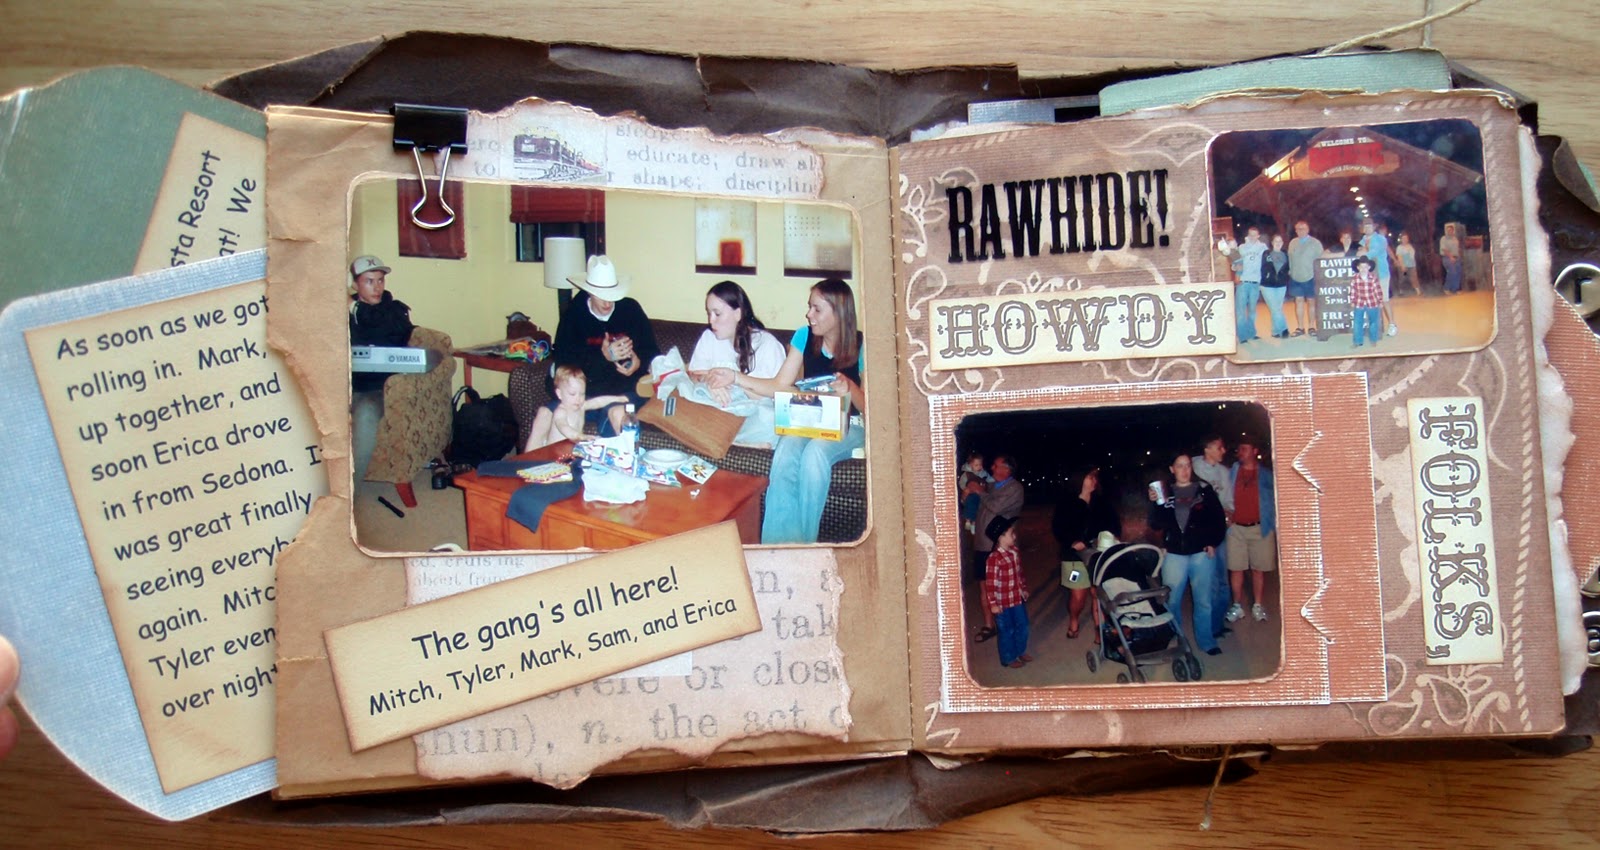
     This is the Paper Bag Album that I made a few years ago after our first trip to Arizona.  We were visiting some family members, and we had a wonderful time.  I wanted an album that was small enough to carry with me and sturdy enough to take some abuse.  This little album has held up very well, especially considering how much it has been carried, handled, looked at, and thrown around.  I knew that it was going to show some wear and tear, so I started off with a vintage look.  That way all the handling and abuse just adds to the charm, instead of ruining the book.  It's hard to believe how many pictures and how much journaling you can put into a few brown lunch bags!

     You can see that I have tags in a variety of shapes and sizes poking out of every possible opening!  Most of the tags have a picture or memento on one side and journaling on the other.  Some of the tags are folded in half, and there is even more on the inside. 

     I picked up maps, tickets, brochures, or whatever information I could find, and used them in my album.  Some of the maps are used as background pieces, and many of the items were cut up and scattered throughout as little bits of journaling here and there.  I used natural desert colors for the book, and if one of the scraps of ephemera that I wanted to use was the wrong color (like the map), then I just scanned it in to my computer and printed it out in a washed out or antique version.
     As you can see in the pictures, I used a lot of interactive elements in this album.  So many things to pull out, turn over, or open up.  People who wanted to could just quickly flip through the book, but if they wanted they could take the time to really enjoy every page and tag.
     I was very happy with the way this book turned out, so of course I took full credit for it on the back.  Hopefully if this album ever gets lost this nameplate on the back will also help it find it's way home.  I think that is always a good idea for a book that is going many places and passing through a lot of hands.

     If you have any questions about anything in this album, like how something was done, or assembly details and such, just ask!  Put your questions in the comment section and I will be glad to answer them as fully as possible.  And if haven't tried a Paper Bag Album for yourself, give it a try!  They can be a lot of fun, they a quick and portable, and very inexpensive to make.  They are perfect for kids too.   Have fun with it!

Bye for now,
Anne 
 

Friday, March 4, 2011

T.G.I.F.!

     Yeah!!  It's Friday!  I hope you have a fun weekend planned.  Mick and I are spending the evening with a group of friends (our trail riding buddies), and then tomorrow I get to go to a Scrapbook Crop.  Whoo-hoo!  All of this has put me in a horse/papercraft/thankful mood, so let's put that all together. 
     There we go!  A Thank You card with horses.  Just right for today!  The horses are stamped, as is the sentiment.  The scalloped oval I cut with a Nestabilities die and my Cuttlebug.  The flowers were a little too overwhelming at first, so I brushed a little ink over the surface.  That toned them down just a bit. 

     Well, that's it for today.  I hope that you like my simple little card.  Leave me a comment with any thoughts or ideas, I always love to read them!

Bye for now,
Anne

Thursday, March 3, 2011

Go Fish!

     Happy Thursday!  We're on the downhill slide, heading towards the weekend.  Yippee!  It's time to think about kicking back and relaxing for a few hours.  Maybe with a fishing pole....
     I just love the silhouette cuts on the A Child's Year Cricut cartridge.  This little fishing boy just makes me think of breezy summer days at the lake.  Come on summer! 
   
     The mat behind the boy is from a Nestabilities Die that I ran through my Cuttlebug.  Both the light and dark blue card stock is from DCWV, and has a white core.  A little sanding gives it a wonderfully worn look.  I used an EK Success border punch for the top of the "water", and added a button and a couple of brads.  Easy-peasy!

     Well, that's all for today.  Drop by tomorrow for another project to wind up the week.
Bye for now,
Anne

Wednesday, March 2, 2011

Gratitude for...everything!

     Do you ever feel like you just need to let someone know how grateful you are?  It may be for something big, or something small, or just for being who they are.  Whatever the reason, you don't have to get stuck in that same old "Thank You" rut.  Change it up a bit!  Find a new way to express your, well... gratitude!
     I found this gratitude stamp in a set of clear autumn stamps that I have.  I stamped it first in blue, and then slightly offset in brown.  This gave it a little bit of a shadow effect.  That is my favorite thing about clear stamps - you can see exactly where you are stamping.  Add a few buttons, round a corner or four, and tie on some ribbon.  Not too much to it, but it does get the point across!

     This card can be used at any time of the year, for a man or a woman.  Blues and browns together are universal!  Make a few up today, and let the people in your life know how you feel.  Express your gratitude!

Bye for now,
Anne 

Tuesday, March 1, 2011

Here Comes the Bride!

     It's starting to look like Spring is on it's way.  That means we can expect a flurry of April showers, May flowers, and June weddings.  Do you have all your cards ready?  You don't want to be caught throwing one together at the last minute.  Here is an idea for a card that you can use for a variety of occasions.  Bridal Showers, Weddings, Anniversaries, this one work for them all.  See what you think.
     This is the bride cut from the Paper Doll Dress Up Cricut Cartridge.  After cutting all the layers, I ran the brides gown through the Cuttlebug in the Tapestry embossing folder.  Next I used a fine tip glue to go over all the raised areas on the gown and the detail marks on the other pieces, and then sprinkled them with a fine glitter.  The background paper is from the DCWV Luxury Stack. 

      If you know the colors of the wedding, you can make the background paper match them, and you can also change the color of the brides hair to make it more personalized.  If the bride is a scrapbooker, use a repositionable adhesive to attach the bride to the background.  That way she can use the bride figure in her wedding scrapbooks.

     I hope you like this sparkly little bride.  Don't forget to leave me a comment to tell me what you think of this one.

Bye for now,
Anne

Monday, February 28, 2011

Monday Morning Card

     Happy Monday!  I hope this is the start to a great week for you.  Let's get it rolling with a card.
     I used my Cuttlebug for this card.  I love the Celebrations Set that came with it, and that is what I used to cut the stamp shapes.  Then I used one of the embossing folders to add the baby buggies to the stamps.  The white mat behind the stamps is embossed with the D'vine Swirls embossing folder.  The stamps are raised up on sticky foam to add a little depth to the card.
     This simple card would work for pretty much any baby occasion, such as a baby shower, an announcement, a welcome baby, or more.  If you would like to emphasize the baby buggies more, you can brush an ink pad over the raised images on the stamps.  You could also change the bottom mat and brads to another color, either pink, yellow, or green. 

     This is the type of card that can be made up several at a time so that you always have one on hand when you need it.  Why not make up a few with different colors this week!

Have a great week,
Anne

Friday, February 25, 2011

Friday! Whoo-hoo!

     Happy Friday to everyone!  I hope you have something great planned for the weekend.  That's what weekends are for, right?  Well, let's start this weekend with a card for Friday.

     Yes, you're seeing things right.  I did not use my Cricut for this one.  It just happens that way sometimes.  I did use my 1" square punch to make my background, and I stamped the cute coffee cup and the saying under it.  All of these papers came from the same collection by S.E.I.  This collection has beautiful papers, some flocked, some foiled, some textured.  I used sticky foam to raise some of the squares and add a little interest.
     I love this stamp set, and it fits my mood much too often.  Hmmm, I think I'll go get some coffee.  And now, I'm off to start my weekend!  Enjoy yours!

Bye for now,
Anne    

Thursday, February 24, 2011

Let's try a Layout!

     Hello!  I'm so glad you stopped by.  I've been sharing a lot of cards lately, and maybe it's time for something new.  I wouldn't want you to get tired of me!  So today, let's look at a layout that I did a while back.  I made this one after part of our Trail Riding group rode the horses to a cemetery near our camp.  It was a nice peaceful spot to take a break and stretch our legs.  Of course we had the kids looking for ghosts!
     I added the fish from the Campout Solutions Cricut cartridge because the place is called Trout Cemetery.  The ghosts and tombstones are from the Paper Doll Dress Up Cricut cartridge, and I think the grass is too, but I'm not positive.  The letters are from Plantin Schoolbook, I think.  If you really want to know what cartridge a certain cut came from, leave me a question in your comment and I'll look it up.  Here are a couple of closer shots.


     I wanted to keep the quiet, peaceful mood of the place when I made the layout, so I choose my colors accordingly.  Calm, cool blues and greens and grays on a black background.  Very relaxing, and a little somber.  The cute little ghosts bring in some spooky fun too.  This layout always makes me smile.  I hope you like it.  Make sure and leave me a comment, I love to read them!

Bye, for now,
Anne

Wednesday, February 23, 2011

Wednesday! We're half way there!

Good morning !
     I hope everyone is ready for a beautiful day!  Last time I checked the forecast that is what was predicted, so I didn't look again.  I was afraid they would change it!  So now, I am expecting a bright, sunny, warm (for February) day and I have brightened my attitude accordingly.  (Insert big smile here.)

     Before I head out to enjoy the weather, I want to share a quick little project with you.  These simple little party favors are just York Peppermint Patties that I have dressed up a bit.  I gave them out at the Cricut Class on Saturday, but they can really be used for almost any occasion.  Because our class was right between Valentine's Day and St. Patrick's Day, I used a heart on one side and a shamrock on the other.  You could change the shapes to anything you wish, to fit any party or get together.
     I used my Gypsy for these, but you wouldn't need to.  With real dial size on, I cut out a sheet of black scalloped circles at 2.25", and a sheet of white scalloped circles at 2".  The hearts and shamrocks were also cut at 2", real dial size on.  The scalloped circles are from Sentimentals, the heart is from Doodlecharms, and the shamrock is from Paper Doll Dress Up.  I also added a little doodling with my black and white Gelly Roll pens, of course.  Can't skip the doodling!

     Well, I'm off to enjoy the great outdoors.  I hope that you get the chance to do the same while the sun is out.  Don't forget to come back tomorrow!

Bye for now,
Anne

Tuesday, February 22, 2011

Try Something New For Tuesday!

Hello, hello!

     Do you ever want to try something new, but you're not sure if you'll like it?  I do, often!  That's one of the best things about cards.  A card gives you a chance to try a new style or technique without a big commitment.  It's not a whole scrapbook, or even a mini-album.  It's just a card.  So jump off the tried-and-true track and go a little wild.  Why not?  It's just a card.
     This is a card that I made a while back for my husband, Mick.  It is a lot more frilly than my usual style.  Not only is it covered in glitter and glitz, but the group of three hearts in the center actually light up.  Talk about bling!  The light up hearts and the forever and love stickers are all part of a set from K and Co.  The swirls are all hand drawn, by me believe it or not, and then inked on the edges, and accented with Stickles.  Here is a close up.

     You can see in this picture where I put a paper doily over the red card stock and dabbed ink over it.  When I removed the doily the inked lace pattern was left behind.  I sanded, painted with acrylic paint, inked, Stickled, and layered.  Sheww!  It took a lot of time, but I like the way it turned out.

     This card was a lot of fun and I'm glad I tried it.  Maybe if I try cards like this a little more often they won't take as long to make.  Hmmmm.....    So what have you tried lately?  Leave me a comment and let me know.

Bye for now,
Anne

Monday, February 21, 2011

Monday Already?

     Where, oh where did the weekend go?  I can hardly believe that it is Monday already.  How was your weekend?  Did you get to spend any time crafting?  I hope so!  I had a great time Saturday at our Cricut Class.  We had a total of 16 adults, and one small assistant.  The afternoon went so fast that I didn't even have time to take pictures of everyone working with their bugs!  Maybe next time.

     Now to start a new week!  I have a new card to show you today.  You know that I like to save time, and paper.  This card is made from my scrap basket, again.  Love using those scraps!  It's like making a card for free.  You may recognise this butterfly cut.  I used this butterfly on the blue and green card that I shared with you a while back.  When I cut the blue and green butterfly, I also cut this pink and purple one.  When I find a cut that I like, I cut more than one at a time so they are ready when I need them.  Saves time, and I can put together a quick card when I need one.  A recipe box makes a great place to store the extra cuts until I need them.
     All three layers of the butterfly were cut at 2.75".  I used a Fiskars Border punch along the bottom of the polka-dotted paper, and drew some faux stitching on the butterfly with a white gelly roll pen.  I added a few white dots here and there for fun.  The word dream is from a Fiskars stamp set, and is heat embossed.  Add a bit of ribbon and this card is finished!

     Leave me a comment to let me know what you think of this one.  I always love reading comments!  I'll be back tomorrow with something new.  Come back by and see!

Bye for now,
Anne

Friday, February 18, 2011

Finally Friday!

     Good morning!

     Are you all ready for the weekend?  I hope so.  I can't wait for our Cricut Class Saturday afternoon!  I'm so excited!!  Ok, enough of that for now.  We have a card to look at!
     This fun card comes from the Once Upon a Princess Cricut cartridge.  This is the perfect cut for girls of all ages, on any day.  Who wouldn't want to be Queen for a Day?  Great for birthdays, anniversaries, or even just because.  There are so many great cuts on that cartridge.  If you haven't checked out the handbook, you really should.  You don't know what you're missing!

     Well, hate to rush, but I have to get back to work on that Cricut Class.  I have a busy weekend ahead, so I'll be back here Monday.  Stop by and say hello!

Bye for now,
Anne

Thursday, February 17, 2011

A Thank You for Thursday!

Good morning Thursday!

     I'm so thankful for the beautiful, warm, sunny weather!  What a change from last week.  The snow is melting, the ice is disappearing, and I'm in the mood for a thank you card!
     It is a very simple card, but sometimes a simple thank you is all that you need.  The blue tag with thank you is a cut from the Tie the Knot Cricut Cartridge, cut at 2.5".  I used my Gypsy to remove the words from the tag and cut it in white to back the blue tag.  The tag is raised on sticky foam with the ribbon running underneath, and mounted on beautiful printed paper from K and Company.  A little faux stitching with a white gel pen finished it off.

     Well, that's it!  Let me know what you think of it.  I always love to read comments about my creations, so be sure to leave some!  ;)

Bye for now,
Anne

Wednesday, February 16, 2011

How about a cup a Joe?

Good morning!
     Have you had your coffee yet?  I have, and it sure was good.  I hope you're relaxing with a cup while you read this, although it doesn't have to be coffee.  Tea or hot cocoa would do just as well.  Why am
I rambling on about coffee?  I'm glad you asked!  I have a fun coffee mug project to show you today.  This mug was part of my Valentine's Day gift to my husband Mick.  Do you like it?

          He loved it, and I guess that's what matters.  I was pretty happy with the way it turned out too.  Here are a few pics with the outside cover removed so the glare is gone.


     All of the shapes and letters are cut with my Cricut from the Old West Cartridge.  As you turn the mug it says Mick's Cowboy Coffee.  I used my Crop-A-Dile to punch the holes in the Happy Trails oval so that I could tie it to the mug with some hemp twine.  I'll show you a picture of the pieces before they were glued to the mug.

     I wanted the coffee pot and mug to look like they were granite ware, so I choose a denim patterned paper scrap that I had.  That gave them the speckled look.  I added the jug cut because he likes to add a little Baileys to his coffee on the weekends.  Of course I inked edges, and added dots and doodles here and there.  I didn't want it to look too new! 

     The mug was one that I picked up at Joann's from the 2 for $5 bins.  Originally it was decorated with cherries, but I found that if you twist the top of the mug just right the clear cover will come off.  Then you can remove the cherry paper to use as a pattern and replace it with any paper you choose.  It's a great price for a one-of-a-kind insulated mug!

     I hope you liked today's project.  Something a little different!  Come back tomorrow and see what's new.  Until then, have a great day!

Bye for now,
Anne 

Tuesday, February 15, 2011

Altered Mailboxes With cards

Good morning!        I hope you had a wonderful Valentine's Day.  I sure did!  My lovable husband, Mick, brought me a pot of adorable little dwarf daffodils.  He knows that I would much rather have flowers for my garden instead of cut flowers.  What a sweetie!  This way I will be able to enjoy them year after year.  Of course I made his gift - well, altered it anyway.  Instead of the usual card, this year I made him 5 simple 3x3 mini cards, and altered a metal mailbox from the Target $1 bins.  I also altered one for our Grandson, Dalton, but he hasn't received his yet.  Shhhhh, don't tell him!

                                            This is Dalton's mailbox.
     And this is Mick's mailbox.  For some reason the picture of the mini-cards isn't showing up.  Hmm....  Oh well.  As you can see, I didn't go with traditional Valentine's Day colors because I wanted to be able to use these little mailboxes to send love notes all year through, not just in February.  That is the idea anyway.  The hearts are just paper doilies that I colored with spray inks and stains.  The postage stamp design on the flag and the door I made using my Cuttlebug.  It is from the Celebrations set that includes one cutting die and four embossing folders.  I love that set, and use it quite a bit.

     The mailboxes were simple and fun to alter, but I wish I would have found ones that had hinged lids.  These lids come completely off.  Oh well.  There's always next year!

     I'm going to say good-bye now, because I have too many new projects calling my name, crafting and otherwise.  I'll be back tomorrow to show you some!  Have a great Tuesday,
Anne

Monday, February 14, 2011

A Very Mini Album

     Happy Valentines Day!  And happy Monday.  It doesn't seem like those two belong together - Valentines Day and Monday, but I guess it happens.  In honor of the occasion, let's look at a little book full of love.
     I made this album after little Tyler (and his Daddy) flew in from AZ to visit the family back here in IN.  The entire album is made from one sheet of 12 x 12 printed paper by K & Company.  The pull out tags are made from another sheet.  I used my Zutter Bind-It-All for the spiral binding, but if you don't have one of those (you really should put it on your wish list!), then you can just use ribbon or binder rings. 

     For a little 3 x 3 album, it sure holds a lot of memories!   You can see the signs of wear and tear from being carried everywhere for a while, but the book has really held up well.  Here are a few of the pages.
     You can see that I used several stamped sayings throughout the book, and had plenty of room for  hand- written journaling too.

     By using a paper with lines for the pattern I had a natural place for the journaling.  Most of the tags have a picture on one side and journaling on the other.

        Just look at that face!

     I saved my favorite photo for the last page.  Isn't he a cutie!   

     These little books can be so much fun to make.  I'll try to get back here as soon as possible with the instructions on how to make one for yourself, but right now I have to go finish up a couple of Valentines Day projects.  Have a wonderful Valentines Day!

Anne

Saturday, February 12, 2011

Blog Hop Entry

     Have you been following along on The Pink Stampers blog hop?  So many great projects!  The challenge was to create something using black with your favorite color.  My favorite colors are black, green, and blue, and I added a little cream to lighten it up. 
     This butterfly is cut from the Sentimentals Cricut Cartridge at 2.75 ".  I punched a few more holes with my Crop-a-dile to let more of the black show through the green.  The blue layer is raised on sticky foam to give it some depth.  I hope you like it!

     Now don't forget to check out all the fabulous projects in the blog hop!  Just go to The Pink Stamper to start the Blog Hop and see all the project entries.  Have fun!

 Bye for now,
Anne

Super Saver Saturday Project

     Flowers are everywhere now - well, in scrapbooking.  Outside.... not so much.  But how do you stay  with the trends, but keep your pages unique?  You make your own embellishments!  With the  great cutting dies out now it is so easy to make flowers out of a variety of different materials to create your own look.  A few days ago I showed you the quilled flowers that I made with the cutting dies made by Provocraft for the Cuttlebug.  Today I have a completely different type of flower to share with you.  I got the dies for the quilled flowers and for the flower today from Kelly at Nufer Designs .  She carries so much fabulous stuff!
     VIOLA!  This bargain priced flower embellishment is made out of recycled newspaper.  The color doesn't show too well in the picture, but it is actually a shimmery red color.  I used a green metal brad for the center of this one, but I will probably change that out when I am ready to use this flower on a project.  How did I do it, you ask?  Well, I'll tell you.

     I used the Tim Holtz Tattered Flowers cutting die from Sizzex, and rolled it through my Cuttlebug.  This was so easy!  The die will cut through several layers of newspaper at a time with no problem.  There are four different flowers on the die, and I used several layers to create this flower.  But first I laid a few of the large  flowers, and a few of the smaller ones out and sprayed them with Glimmer Mist in Cherry Red.  I let them set for a while, and when they were almost dry I crumpled them up a bit so they wouldn't just lay flat.  When they were completely dry I stacked them up and arranged them as naturally as possible and then pierced a small hole in the center for a brad.  Super easy!  I've been playing with several different types of papers and sprays to see what kind of looks I can come up with.  The possibilities are endless!  What would you make a flower out of?  Hmmmm..... 

     Well, you think about that, and feel free to post any ideas for flowers in your comments.  Who knows what I'll try next!

Bye for now,
Anne
   

Friday, February 11, 2011

A Lovey-dovey card!

 Happy Friday! 
      Pshew, I thought it would never get here!  I hope you've had a good week, and have great plans for the weekend.  Can you believe that Valentine's Day is just a few days away?  How did that happen?!?!  Anyway, in honor of this celebration of love, I thought that it was time for another love themed card.  This card could be used for a Valentine's card, a wedding card, or just any ol' "I Love You" type of occasion.
     That's right!  A love card without a spot of red or pink on it.  Crazy, I know.  But I kind of like the way this card turned out.  I wanted it to look like a pair of birds (doves?) sitting on a branch with the moon behind them.  Close enough.  So here are the details.

     The moon was cut from the George and Basic Shapes Cricut Cartridge at 3.5".  I used a printed card stock from the DCWV Luxury Stack, in kind of a shimmery champagne print.  Both the birds and branch silhouette and the True Love were cut from the Tie the Knot Cricut Cartridge at 1.75".  I used my Cricut Expression and my Gypsy so that I could put all the papers on the same mat and cut them at the same time, but you could easily cut them with any sized Cricut.

     After all the pieces were cut, it was easy to glue everything together.  I thought about popping the bird silhouette up on sticky foam, but I was afraid the branch ends would catch on the envelope and get torn up.  I played it safe and stuck the birds right on top of the moon.  A strip of ribbon to finish it off, and this card was done!  I hope you like it.

     Well, that's it for today.  I'll be back soon with another fun project.
Bye for now,
Anne


Thursday, February 10, 2011

Another Day, Another Card!

     Frosty, frosty, good morning!  How can it keep getting colder?  Brrrr!  I am so glad that I am hibernating with my crafts through this weather.  This is no time to be working outside!  But inside, it's a whole different story.

     I found a piece of paper in my scrap basket, and I knew I wanted to make a card with it.  But every idea I came up with would cover up the best part of the paper.  Sooo.... I decided to just use the paper as the card design.  It doesn't get any easier than this one!
     I used my 1" square punch to break down the flower part of the design on the paper.  I used a pen to draw fake stitches around each square, and then raised them up on sticky foam.  It took two of my EK Success border punches to get the look that I wanted for the bottom of the brown card stock, but they worked together well.  Then I tied a creamy yellow ribbon below the flower squares, and layered the whole combination on a blue card base. 

     This card was very fast and simple once I decided what I was doing.  Why don't you try something similar with one of your favorite scraps from your stash!  I'd love to see what you come up with.

Bye for now,
Anne

Wednesday, February 9, 2011

Wednesday is Card day!

     Hello again!

     It has been a couple of days since I shared a card with all of you.  Flowers, mini-albums, favor boxes.....psheww... all kinds of stuff!  So today we'll take it easy and just look at a simple card that I made this weekend.
     Aren't the colors nice and soothing?  I love the fabulous printed cardstock in the Linen Closet Stack from DCWV.  All of the papers on this card are from that same stack, and that makes it so easy to choose colors and patterns that work well together.  DCWV has already done all the matching work for us!

     Now on to the details.  The bird cut is from the Wall Decor and More Cricut Cartridge, cut at 3".  I ran the top layer of the bird through my Cuttlebug in an embossing folder.  (I believe it is called Houndstooth.)  After that I sanded it lightly so the white core of the DCWV card stock could show through.  I added a little green ink around the edges of the bird before gluing the two layers together.

     The mat behind the bird was cut with a Spellbinders die that I rolled through my Cuttlebug.  The tan strip was cut with a Martha Stewart border punch.  Those deep border punches are so versatile!  All the pieces except the bird were inked on the edges with a brownish tan ink from studio g.  I raised the bird on sticky foam to give the card a little more dimension.  Oh, I almost forgot!  I added another border punched strip inside the card, from the striped print.

     Well, hopefully this card gets you thinking about SPRING!  For now, try to stay warm.

Bye for now,
Anne