Showing posts with label Mini-Album. Show all posts

Monday, March 7, 2011

Monday Mini-Album!

     Happy Monday!  I hope you had a wonderful weekend.  Did you get some crafting in?  I had a great time Saturday at the scrapbook Crop that I attended.  Now I can't wait for the next one.  Good thing it's next Saturday!  Usually I don't get to go to crops so close together, but it just worked out this time.  Yipp-ee! 

     Back to the business at hand.  You didn't stop by to read my ramblings, you want to see a project, right?  Don't worry, I have one to show you.  I haven't shared a mini-album with you in a while, and I thought that might be a good way to start the week.
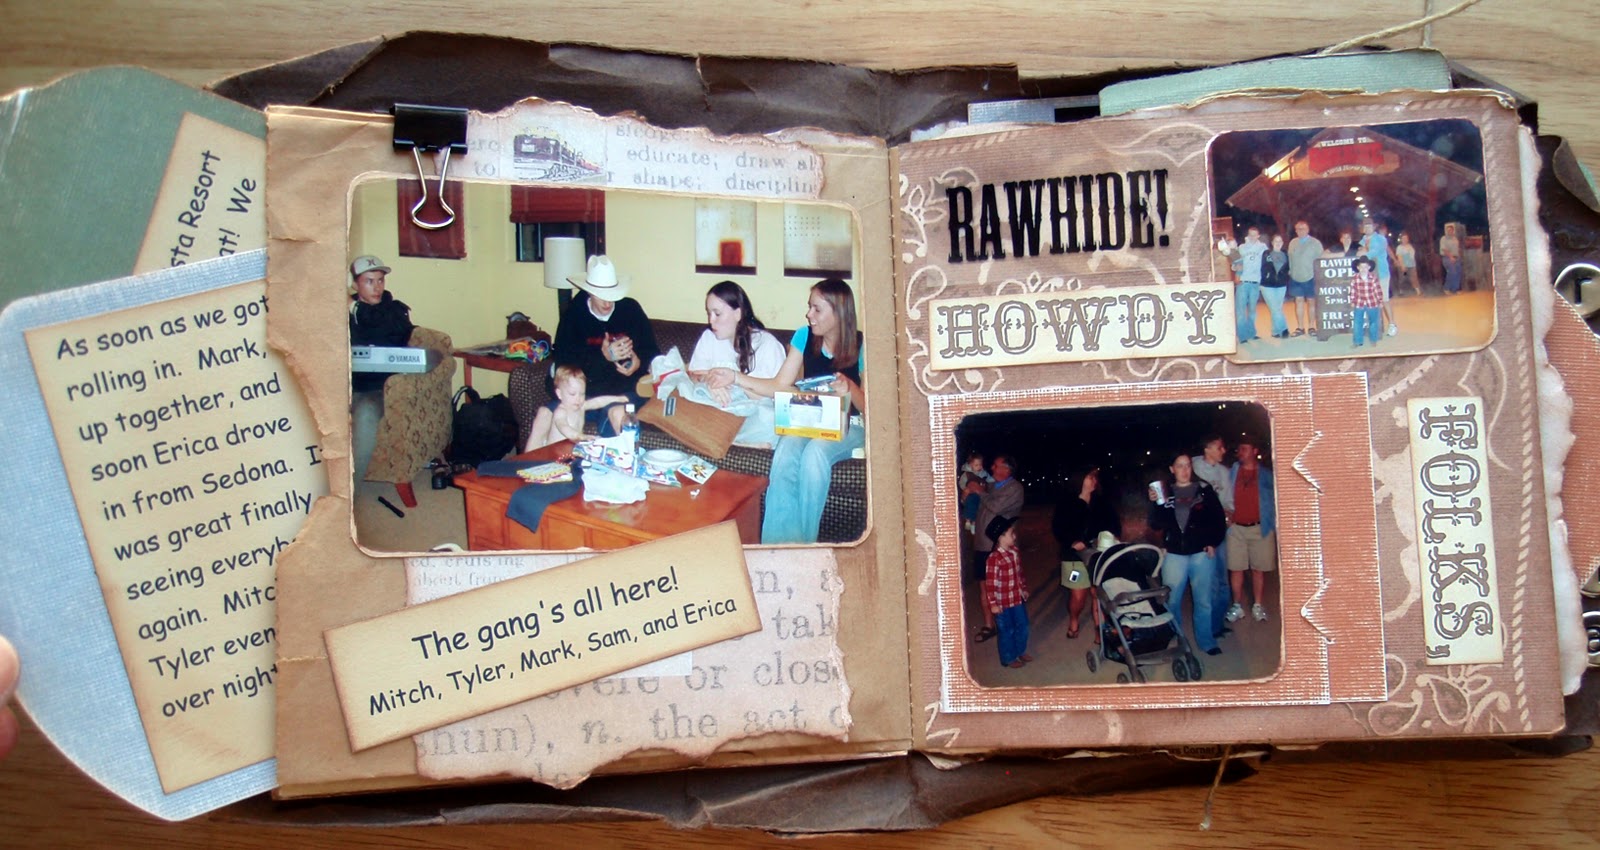
     This is the Paper Bag Album that I made a few years ago after our first trip to Arizona.  We were visiting some family members, and we had a wonderful time.  I wanted an album that was small enough to carry with me and sturdy enough to take some abuse.  This little album has held up very well, especially considering how much it has been carried, handled, looked at, and thrown around.  I knew that it was going to show some wear and tear, so I started off with a vintage look.  That way all the handling and abuse just adds to the charm, instead of ruining the book.  It's hard to believe how many pictures and how much journaling you can put into a few brown lunch bags!

     You can see that I have tags in a variety of shapes and sizes poking out of every possible opening!  Most of the tags have a picture or memento on one side and journaling on the other.  Some of the tags are folded in half, and there is even more on the inside. 

     I picked up maps, tickets, brochures, or whatever information I could find, and used them in my album.  Some of the maps are used as background pieces, and many of the items were cut up and scattered throughout as little bits of journaling here and there.  I used natural desert colors for the book, and if one of the scraps of ephemera that I wanted to use was the wrong color (like the map), then I just scanned it in to my computer and printed it out in a washed out or antique version.
     As you can see in the pictures, I used a lot of interactive elements in this album.  So many things to pull out, turn over, or open up.  People who wanted to could just quickly flip through the book, but if they wanted they could take the time to really enjoy every page and tag.
     I was very happy with the way this book turned out, so of course I took full credit for it on the back.  Hopefully if this album ever gets lost this nameplate on the back will also help it find it's way home.  I think that is always a good idea for a book that is going many places and passing through a lot of hands.

     If you have any questions about anything in this album, like how something was done, or assembly details and such, just ask!  Put your questions in the comment section and I will be glad to answer them as fully as possible.  And if haven't tried a Paper Bag Album for yourself, give it a try!  They can be a lot of fun, they a quick and portable, and very inexpensive to make.  They are perfect for kids too.   Have fun with it!

Bye for now,
Anne 
 

Monday, February 14, 2011

A Very Mini Album

     Happy Valentines Day!  And happy Monday.  It doesn't seem like those two belong together - Valentines Day and Monday, but I guess it happens.  In honor of the occasion, let's look at a little book full of love.
     I made this album after little Tyler (and his Daddy) flew in from AZ to visit the family back here in IN.  The entire album is made from one sheet of 12 x 12 printed paper by K & Company.  The pull out tags are made from another sheet.  I used my Zutter Bind-It-All for the spiral binding, but if you don't have one of those (you really should put it on your wish list!), then you can just use ribbon or binder rings. 

     For a little 3 x 3 album, it sure holds a lot of memories!   You can see the signs of wear and tear from being carried everywhere for a while, but the book has really held up well.  Here are a few of the pages.
     You can see that I used several stamped sayings throughout the book, and had plenty of room for  hand- written journaling too.

     By using a paper with lines for the pattern I had a natural place for the journaling.  Most of the tags have a picture on one side and journaling on the other.

        Just look at that face!

     I saved my favorite photo for the last page.  Isn't he a cutie!   

     These little books can be so much fun to make.  I'll try to get back here as soon as possible with the instructions on how to make one for yourself, but right now I have to go finish up a couple of Valentines Day projects.  Have a wonderful Valentines Day!

Anne

Saturday, February 5, 2011

Super Saturday!

     Hello again!  Sorry I'm so late checking in today.  I was busy all day at a scrapbooking crop.  Fun friends, great food, and scrapbooking.  What more could you ask for on a cold February day?  Ok, Ok, we could have done without the 4 " of snow that fell this afternoon, but we had a blast indoors!

     Oh well, on to more relevant topics.  Let talk about a project!  Hmmm..... would you like to see another mini-album?  Great!  This is an album that I made a while back.  We were out with a group of friends for New Years Eve, and of course I had my camera.  I picked up a few of the interesting beer mats that the bar was using, and turned them into a mini-album.  If you can't guess from the shape of the beer mat, we're in Indiana.

I needed a few more pages, so I traced a beer mat and cut the shape out of cardstock.  I used a cardstock page for every other one.

     I also added a few Cricut cuts like the hat above the picture on the right page.  These are just a few of the pages, but you get the idea of how the book turned out.

     After I finished all the pages I used my Bind-it-all to make the holes and put in the wire binding.  The finished book is only a few inches tall, but it made a great little book to carry around and show to our friends.  

     I hope you enjoyed my little project.  If you haven't ever made a mini book, you should give it a try.  They are a lot of fun to make, and to look back on later.  What have you got to lose!

     Well, that's it for today.  Bye for now,
     Anne 

Thursday, February 3, 2011

Let's check out a book!

     The sun is out and shining brightly!  Of course it is still cold here.  I hope that you are having beautiful (if not warm) weather where you are.  Either way, it is another great day for crafting.  How would you like to see something different today?

     Instead of a card, I have a mini-book to show you.  I love mini-books for a number of reasons.  Most importantly for me, they are quick and easy to put together, and they are the perfect size to carry around to show your friends and family.  This book is one that I made a couple of years ago after our annual trip with our riding group to The 4 -J Big Piney Horse Camp in Missouri.  We always have a good time, and I like to finish my book up as soon as possible after we get home.

     I made this book out of a few 5 x 8 tabbed index cards that I stained with strong coffee to make them look old.  I love the vintage look, and it goes well with our riding photos.  To make the stain  I dissolve 1/4 cup of instant coffee crystals in 1 cup of hot water, and add about 1 tsp of vanilla for the scent.  It doesn't take long to just dip the index cards and shipping tags into the stain and lay them out to dry.  I usually do up a bunch at a time so that they are ready to use when an idea pops into my head.  The papers were all from the Hopscotch line from K & Co.
  This is the front cover of the book.  I made a smaller photo copy of a bumper sticker from the camp.


     On some of the pages I made pockets to hold stained shipping tags, or other ephemera from the trip.

     I added a few things to open, pull, or lift for more pictures or information.  I think that it keeps the book more interesting and gets the viewer involved more than just flipping pages.


It's hard to believe how many pictures and how much information you can fit into one of these mini-books!


     Well, that wasn't every page, but you get the idea.  This book has held up very well through all the handling and travel.  The best part about vintage style is that the more beat up the book gets, the better it looks.  I have made several books out of index cards like this one.  The only thing that I have really changed is that I usually sew the edges now.  That way the tags and such inside the pockets don't stick to the adhesive.

That's all for today!  See you tomorrow,
Anne