Monday, January 31, 2011

Monday Again!

     Happy Monday everyone!  I'm glad you decided to stop by and see what was going on around here.  Hopefully the weather isn't too bad where you are.  They are forecasting some nasty storms later today in our area, but let's forget all that!  Time seems to be flying by, and before we know it spring will have sprung.  So, with spring in mind, I have a St Patty's Day card for you!
     Somehow plaid just seemed right for this card!  I started this card a while back, and finally got it all together (well, the card anyway).  I didn't write down the details, but I believe the shamrock cut is from the Paper Dolls Dress Up Cartridge  for the Cricut, cut at 3.5", real dial size.  Whenever you are using the shapes from the paper doll cart by themselves, make sure to turn on the Real Dial Size button.  Otherwise the shape will be cut smaller so that it is proportional to a paper doll cut at the size you dialed up. I think this is my favorite all-time cartridge because of all the different shapes!  This really is a simple card, with just a little inking and pen-drawn stitching.  The border punch is by Martha Stewart Crafts.  The Irish blessing inside the card is printed from my computer.
    Leave me some comments and let me know what you think of this one.  I always love to read comments! 
Thanks for visiting my blog,
Anne

Sunday, January 30, 2011

Silly project for Sunday!

     Hello everyone!  I hope you're all having a wonderfully relaxing day.  I spent the day with Dalton, a 10-year old who has been doing great things in his reading class at school.  I thought that this deserved a reward!  I pulled the Cricut Expression out, and used my Gypsy with the Animal Kingdom Cartridge.  That cartridge is an oldie but a goodie!
     I used the bookmark feature to cut a set of animal bookmarks.  I didn't get too fancy.  I hit the shift button and cut a few layer pieces for each one in a different color, and drew in a few details with a brown pen.  I cut every bookmark twice, and glued the two together so they would be a little more sturdy.  Finally, after gluing all the layer pieces on, I covered the front and back with clear Contact Paper.  Unfortunately, I didn't think to take a picture until after I put the Contact Paper on so there is a lot of glare in the picture.  Sorry about that.  I'll try to do better next time. 

Good bye for now,
Anne
  

Saturday, January 29, 2011

So-Glad-It's Saturday!

     Good morning everyone!  I hope you have something fun (and crafty) planned for today.  I have another little card made from my scrap basket to show you.  I love using those scraps up!
     How about a Snowflake card for a snowy January Saturday!  I used my 1" square punch to make an inchie snow scene background.  Then I used the Winter Lace Seasonal Cartridge with my Expression to cut a 3.25" snowflake and it's shadow.  This is the very first snowflake on the cartridge, but you could really use any one the you like.  The shadow for the snowflake is the button directly under the snowflake button on this cartridge.
     The  border along the bottom is from a Martha Stewart punch, and the green brads are from my stash.  I used a pen to draw stitching around the inch squares and the top of the border strip.  You can't really tell in the picture, but I used glitter glue on the top of the snowflake for a little sparkle, and the raised it up with foam tape.  All that was left to do was to attach it to a card base.  That's all there is to it!
     Have a great weekend!  I'll be back in a day or two.
Bye for now,
Anne

Friday, January 28, 2011

Fun Card Friday!

     Let's start this blog out right!  Since Friday is my favorite weekday (isn't it yours too?), I thought I would try to post a fun card every Friday.  Some cards are sweet, some are serious, some are beautiful, And some are FUN!  See what you think of this one.

     Doesn't this card get you ready to start the weekend right?  I used the Rock Princess Cricut cartridge to cut the guitar at 3" and the Girls Rock at 1.5".  The black mat under the guitar was cut with a Spellbinders die.  I used a white gelly roll pen here and there, and a fine black pen to make the guitar strings.  Add a few brads from my stash, a little bit of foam tape to raise the cuts off the card, and "ta-da!" a girly fun card.  And the best part is that all of the printed paper and cardstock came from my scrap basket. 
     Let me know what you think of Fun Card Friday, and my GIRLS ROCK card.  I'd love to read some comments.  And click the Follow button if you like my work.
     Bye for today,
     Anne

Thursday, January 27, 2011

Let's talk Cricut!

     I can't believe that it is almost the end of the month!  Wow!  I have been working on getting ready for our Cricut Class that is coming up in  mid-February. I know it is going to be a lot of fun, and I can't wait! " What am I talking about?"  you ask.  Well, let me explain.
     I've had my Cricut for a few years now, and every time another friend or family member gets a Cricut they always say that we'll have to get together with our Cricuts.  (These little bugs can be rather over-whelming in the beginning!)   Since I am hearing this more and more these days, I thought that it would be fun for all of us to get together as one big group and learn from each other.  The problem was - where?  My friend Jennifer came through for us with a community classroom where she works.  Yeah Jennifer!
     So if you are in the Lafayette, Indiana area and you have a Cricut, or the use of one, come join us!  We will be getting together Saturday, Feb 19th from 1-5pm.  If you want more info, let me know and I can email all the details to you.  It's gonna be great!!

Wednesday, January 26, 2011

The not-so-identical- twin....


     Well, it's Wednesday, and I have another card to show you.  If you want the info to make this card, check yesterday's post.  Same design, different cards.
     I like to save time by making more than one card at a time, but I still like for each one of my cards to be different and unique.  This is the way to do it!  Just use the same design, and the same Cricut cuts, but different colors and papers.  Other than that these two are basically the same card.  And the second card goes together really fast!  Here are the two cards together, so you can compare.

     The one with the black silhouette is definately more dramatic, but they both look look good IRL.  Well, I think so anyway.  ;)  Let me know what you think - I love to get some comments!

     I'll be back in a day or two with more crafty fun!  Stop by and see me, or click the follow button on the top right side.  Bye for now,
Anne

Tuesday, January 25, 2011

Happy Tuesday!

Good morning!
     Let's try something new.  Yesterday I said that I would show you a card that I made with my Cricut, so let's give it a try.  (I hope that I can figure this all out.  Keep your fingers crossed!)
Yeah!  It worked!  (And it was surprisingly easy....)  Anyway...

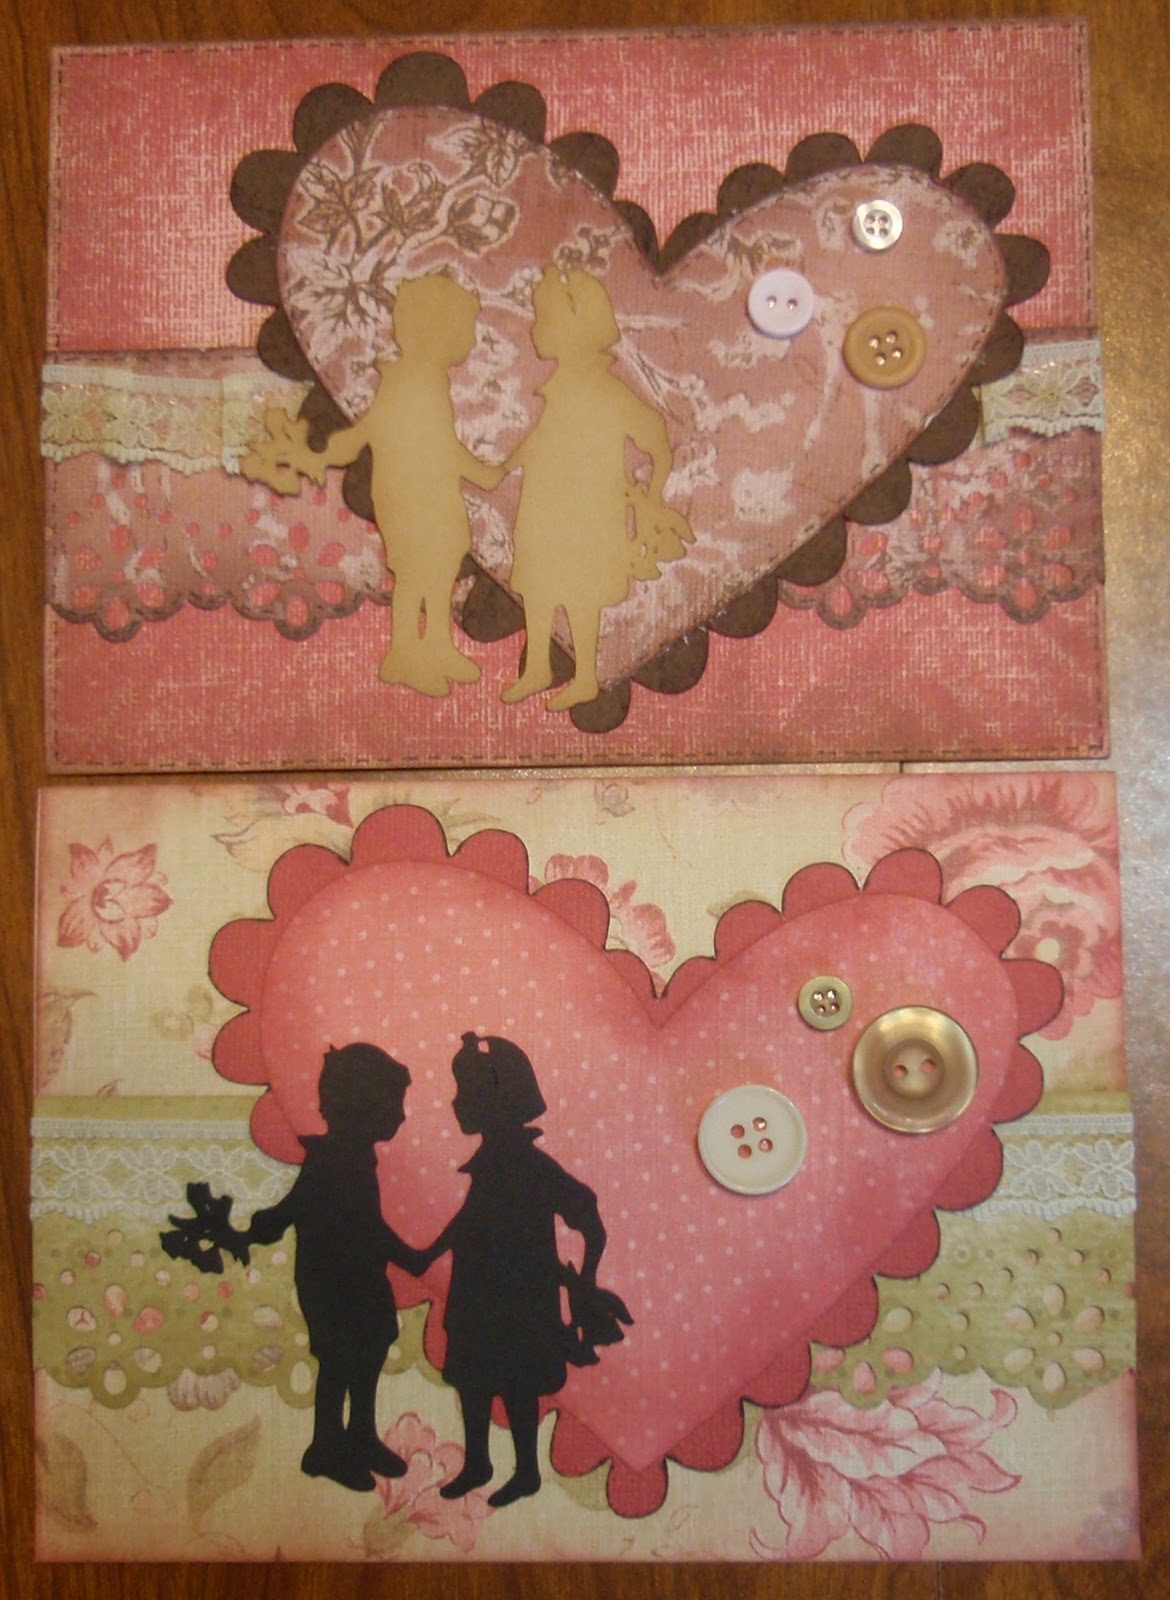
     This is a card that I made yesterday using the two cartridges A Childs Year (or ACY) and Doodlcharms (DC).  The images on ACY are very realistic and detailed, so make sure you have a good blade and mat for your Cricut.  I used my Cricut Expression and my Gypsy to make these cuts, but they are small enough that you could also make them with a smaller Cricut and the cartridges.  Now for the details.
 I cut the image of the boy and girl from ACY at 3" in black.  The scalloped heart and smooth edged heart are both cut from DC at 4.5".  I choose very similar colors for both heart pieces, but you can use contrasting colors if you wish for more definition.
      Using my paper trimmer I cut my background paper at 5" x7".  Next I used a Martha Stewart deep border punch to put a pretty edge on one strip of printed paper for the front of the card, and one to decorate the inside.  I used the same punch for both strips, and trimmed them to the proper width afterwards.  The strip on the front of the card is 2" x 7" and the one inside is 1.5" x 7".
     The next step is inking the edges.
You can see in this picture how the inked left side of the heart looks so much more finished than the plain right side.  It's the little details that really make the difference!  The inside heart piece and the background paper are inked with rose, the strip across the front is done with Chamomile ink from Paper Trey Ink, and I used the side of my black Copic marker brush tip to put a thin black edge around the scalloped heart.
  Now for assembly:
1. Attach a narrow strip of lace across the front border punched piece.  I used my ATG 740 and just ran a strip of adhesive across the entire piece of lace.  Make sure you cut the lace long enough to tuck the ends behind the paper.

2. Adhere the strip with the lace to the background paper, not quite halfway up.

3. Place the smooth edged heart onto the scalloped heart, and attach this over the lace, just slightly to the right of center.

4. Affix the children image to the left side of the heart.  For this I used my ATG in the larger areas, and a Zig Glue Pen in the smaller spots.  Be sure to glue this piece down well so that it doesn't catch when the card is placed in the envelope.

5. Complete the card front by attaching three buttons to the right side of the heart with Glue Dots, and adhering the entire piece to a 5" x 7" card base.
6. Finish the card by applying the remaining punched strip to the top edge of the card inside.

That's it, you're done!  Thanks for stopping by.  Check back tomorrow to how to change up your cards just by changing your papers.  Happy Crafting!


Monday, January 24, 2011

Monday, Monday.....

     Well, it's Monday.  Even though Monday always seems to be filled with "getting back to normal" stuff, I did find a little time for cardmaking today.  Hopefully I can get some pictures up tomorrow.  I love working with my Cricut, and the A Childs Year cartridge is one of my favorites!  The detailed images are not only beautiful, but also timeless.  So stop by Tuesday and see what I come up with. 

Sunday, January 23, 2011

The Beginning...

     I've decided to start a blog!  Like so many other crafters, I thought that this would be a great way to share my creations.  Hopefully I will be able to post something new several times a week.  While I would love to say I will post every day, let's be realistic - a few times a week will be a great start!

     Sooo..... after I get this all set up the way I like it, I'll start adding some of my projects, ideas, and creations.  Maybe someone, like you, will come by and let me know what you think of it all.